
Hey everyone, it’s Mike. You’ve likely seen (or heard of) me in Jamie’s posts, particularly those posts that involve what she’s eating. That’s because I feed her. And you may have also gleaned from your followership of this blog that Jamie and I are the type of folks that like to do take-out. A lot. But it’s too expensive, and on top of that it’s difficult to keep control of your calorie intake when you don’t handle the preparation of your food.
So as the hunter/gatherer of the family I have taken it upon myself to combine the good things about eating out with the better things about preparing dinners at home. I think we can all agree why eating out is sometimes a necessary evil:
- Convenience: The fact that we are so easily able to outsource food preparation (and delivery #Postmates) means that we are free to do a number of other things while the meal is coming together. On weeknights where I want to go play some basketball after work, and/or where Jamie has a late meeting, the two of us will usually arrive at home past 7:00pm, hungry, tired, and more interested in relaxing than starting to prepare a whole dinner. Sometimes the mental stress of figuring out what we want to eat leads to that sometimes inevitable conclusion… “let’s just get something tonight.” The momentary relief masks the shame we would typically experience when consciously making a decision to overpay for food that is less nutritiously valuable than a lot of the stuff we are able to make in our own kitchen.
- Taste: With no offense toward anyone’s cooking ability, including my own, the flavors that restaurants are able to achieve and perfect over time, in many cases, become such a familiar craving that they carve out a permanent spot on our menu of available food choices. Case in point, the California Burrito, a taco shop item that shows up in my diet so frequently that it would be a bullet point on my Wikipedia page if I had one. This post, and others in the future, will be spotlighting some of our favorite restaurant, fast food, and quick serv options that I will attempt to replicate (or pay homage to) on our home menu.
Now, how can I deliver on the above points with an inexpensive home-cooked meal that will satisfy the both of us? Well, first I need to let you in on a little secret.

The $99.00 Anova Sous Vide Precision Cooker. Takeout’s worst nightmare. This thing is 100% idiot proof, delivering scientific grade precision on cooking temperatures without requiring much more than a “set it and forget it” method of preparation. Jamie’s mom actually got this thing for me last Christmas, and in as non-dramatic a way as possible I want you to know that it has forever changed my life. So if you are still reading this post for some reason, and have not yet opened another tab to buy this stunning piece of technology, click that MF link above.
Ok so for those of you that didn’t take any lab-science classes in school, let’s break down what a sous vide does in layman’s terms. When you insert that magic cooking wand into a tub of water, then set a target temperature, the device will heat and circulate the water into somewhat of a high-powered jacuzzi for your food. When the food is inserted into the water bath, it is slowly brought up to the target temperature. But get this… it won’t go over. And that means it is literally impossible to overcook your food. For people like Jamie and I, who eat meat at medium rare, this is a major key.
Anyways, let’s move on to the recipe already, this post is about ribs, not my Christmas List sales pitch.
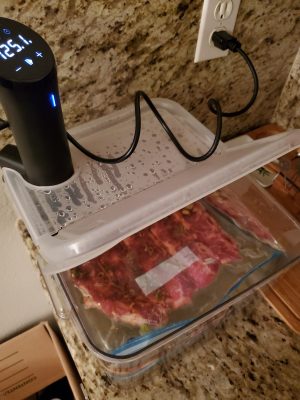
1. Pre-heat your sous vide to 125°
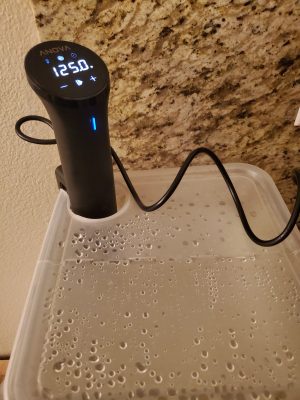
There is a cool mobile app that will allow you to turn this thing on remotely (I haven’t set it up yet). So what I’m doing in the meantime is either coming home for lunch, or after work before my workout, and flipping this guy on. It does not take long to heat up, but the cool thing is you don’t have to wait before you put the food in. The food will slowly rise in temperature with the water regardless of whether you pre-heat before dropping in. I chose 125° because like I said, I’m a medium-rare guy, and I know that I’m going to sous vide these ribs then finish cooking them on a high heat griddle pan, so I can choose a temperature a few degrees under my desired endpoint. For more information on cooking times for different types of food, check Anova’s guide. You can learn a lot of fun things about sous vide, like, for example, you can pasteurize raw eggs then make safe-to-eat cookie dough. You can also cook chicken to internal temps that are much lower than USDA’s standards for traditional cooking methods, unlocking a level of juiciness you may not have realized was possible. I’ll post a chicken recipe later.
While the temp starts to rise, or at anytime before or after you turn your device on (i.e. Step 1 and Step 2 can really happen in any order), you need to prepare your bag of ribs.
2. Prep your bag of meat
Early on in Jamie’s relationship, we were out driving around after a hike, starving, and I saw an L&L Barbecue out of the corner of my eye. I realized we were about to have our first fast food-venture. I took her in, fired off a nice order of chicken katsu and short-ribs, and we pigged out.

Jamie loved the ribs, and over time, as our relationship blossomed, so did our love for ordering L&L Hawaiian Barbecue. In fact, our first apartment had one right next door. That actually became low-key problematic, but we ended up limiting our orders to about once a month. However, when we recently moved, we are no longer within a stone’s through of this spot, and the cravings have started to hit home. So I’m walking around Pavilions looking for entrees in the meat section, and I see some flanken style cut ribs on sale. Boom. Game time.
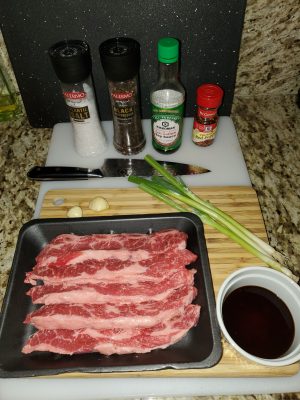
We’re gonna throw together a very simple marinade here that intends to achieve that sweet-savory-spice trifecta that you want with asian ribs.
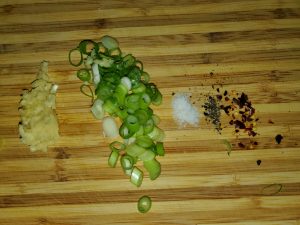
Couple cloves of crushed garlic, chopped green onions, salt & pepper and red chili flakes. I’m not much of a measurement guy, so I typically will taste marinades as I create them to see if the flavor is coming out nicely. My one suggestion is to always start small on the salt: you can always add more, but you can’t unsalt something. In fact, unsalt is not even a word. There’s a reason for that.
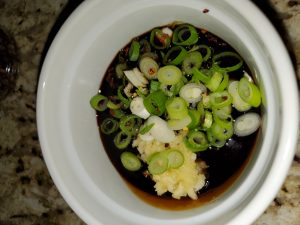
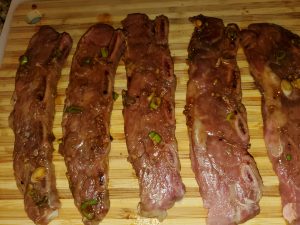
We’re gonna combine our fresh ingredients with a few tablespoons of teriyaki sauce and a couple splashes of soy. Mix well to combine, and have a little taste. Pretty good right? Ok maybe a bit more chili flake if you like it spicy, or you can bam it up with some sichuan peppercorn, star anise, ginger, or other types of asian seasoning. Again, I chose to keep these pretty simple. Then it’s time to glaze these ribbies.
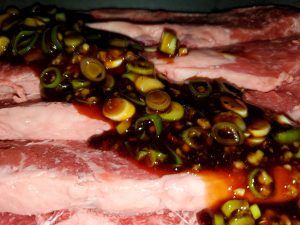
The fat marbling on these ribs is making this picture look like thick-cut bacon. Pour that sauce out and massage it into the meat, making sure to coat everything. When you are finished, prep your bag for the cooking process.
Sous vide cooks food in vacuum-sealed plastic, locking in flavors and ensuring that all parts of the food are evenly heated to the same temperature. From my understanding, you can vacuum seal food in a few different ways:
The cheap way: Through a scientific process that I neither understand nor am able to explain, a simple ziploc bag, when kept open at the top as the bag with food inside is slowly lowered into hot water, will displace the air and naturally vacuum seal its contents. Keep in mind, this can only be achieved if you have pre-heated your water completely prior to starting this process. Now, I’ll admit, I have never used this method, but there are YouTube videos out there that I’ve seen, so I know this works. You can find a quick tutorial via Google search if you want.
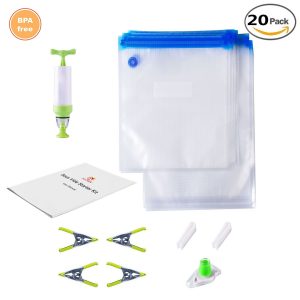
The recommended way: When I got my sous vide, I was also gifted a little vacuum seal starter kit designed for this cooking method. It comes with fastening clips, a hand-operated suction device, and a bunch of different-sized bags to use in your sous vide. Pictured below is the set I got, which can be found here! Having used this method consistently, I will probably always purchase these $25.99 kits, but I guess if I ever run out of these machine-washable bags and I’m in a pinch, the ziploc method would work.
The expensive way: If you are invested in this cooking method, it may be worth it to you to get the real deal vacuum sealer. I found the Sous Vide Supreme from Williams Sonoma for $130.00. This is what you would see a restaurant chef use if he was utilizing a sous vide.
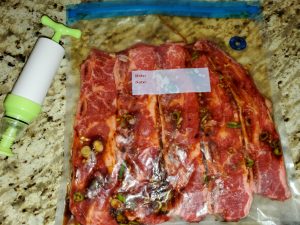
So the key when vacuum sealing is to maintain the integrity of the seal so it stays intact through the cooking process. Not too hard, just means that you want to avoid getting sauce all over your zipper. Transfer your meat into the bottom of the bag, making sure everything lays flat and doesn’t overcrowd or overlap. Then seal the top, lay the bag flat on the counter, and start pumping your suction device on the blue target until you have a beautiful shrink-wrapped bag that is ready for cooking.
2. Cook your bag of meat
At this point in the process, I’ve been home for about 10 minutes or so, and I’m nearing the make-or-break point in the night where I would either sit down on the couch and surrender my fate for the evening, or run out of the house and go get a quick workout in. Given that I have no further cooking obligations for at least the next hour, I decided to meet a friend of mine down the street for some basketball. I slipped the bag flat into the bottom of my pre-heated tupperware container, took note of the time, and walked out the door.
3. Sear and serve
Roughly an hour and a half after I left, I got back home. Jamie had arrived, she was sitting with our dog Jackson at the computer. I immediately told her “dinner is ready,” knowing that what I said was technically correct, although there are a few remaining steps to get that restaurant-quality cook.
(Brief science lesson; this won’t be on the final so you can skip this if you want!) Without trying to bore you too much, or trying to act too smart about a subject I have no actual expertise in whatsoever, I want to share a brief bit of science to explain why the sous vide makes such delicious food. There is something in cooking known as the Maillard reaction. Put simply, the Maillard reaction is the level at which “browning” occurs, where amino acids and sugars in the food are reacting to the introduction of high heat. This reaction usually occurs above 140 degrees. Note that I have been cooking at 125 degrees. That should tell you that while my ribs have cooked to my desired temperature, they have yet to brown, and so when they come out of the bath, they will not look especially appetizing. And although these ribs will be incredibly juicy and tender at this stage, they will lack seriously in texture. To me, the most beautiful looking piece of meat is one that has been carmelized, browned or even burned until a nice crispy sear forms around the edges. By bringing these ribs up to temperature without any browning occurring, the proteins in the meat are now primed to sear very well and very quickly! That means you can lock in an incredible texture and cut into them without having to “rest” them like you would a traditionally cooked piece of beef.
Ok, so the ribs are out, and fully cooked, but needing that final sear to ensure we get the crispy burnt edges and smoky aromas that make these ribs such a staple. I think these particular style of ribs may have started in Korea (see Galbi ribs). But like I said above, we are going in an L&L direction tonight.
So heat your cast iron grill-pan (or normal cast-iron pan, or even normal non-stick pan if you haven’t discovered cast iron yet) to medium-high or high heat. This decision depends mostly on your tolerance for the smoke alarm. At this point I have asked Jamie to open the back door and windows because she knows how I like to get down (high heat). Jackson has sensed the energy in the room has changed, and he is cautiously interested, sniffing into the air as I start laying my ribs onto the piping hot oiled pan. If you don’t immediately hear loud noises when you are starting to sear your meat, pull back and wait, restarting the process only when you can assure that the heat on the surface of the pan is blisteringly hot.
Keep in mind you will only need to sear the ribs for a minute or two per side, you can pretty easily keep an eye on the underside to achieve your perfect level of doneness (probably somehwere between lighlty browned and charred black). While the ribs are popping on the grill, I quickly prepped the old Uncle Ben’s basmati rice, and served a couple spoonfuls of macaroni salad onto the plates. I unapologetically use 90-second rice, every chance I get, it tastes great and takes zero timing or forethought to get on the plate when the other food is ready.
*FLIP RIBS*
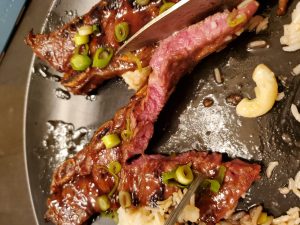
At this point, you really get to admire your work. Perfectly tender and medium rare inside, great seared grill marks on the outside, and the amount of the cooking process that you were actually involved in was under 10 minutes.
As you finish grilling, use that leftover sauce that remained in the sous vide bag to pour over the ribs, and baste a final time with teriyaki sauce as you plate your food.
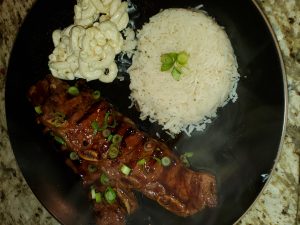
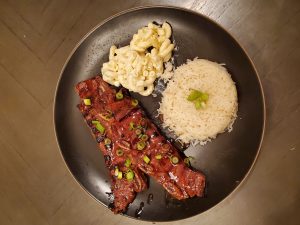
The finished product will give L&L a run for its money any day, at a fraction of the price.
Thanks for reading, and stay tuned for more recipes that pay homage to our favorite take-out and dine-out classics. If you have suggestions of foods you want to see on future blogs, leave a comment below and we will choose one of your suggestions to be featured next month!